Have you ever typed a certain word in Microsoft Word only to get the red zig-zag line underneath? While you may think a word is right or universally used, Microsoft Word may think otherwise. One reason why this may occur is your proofing setting on Microsoft Word. That is if you set up your Word proofing setting to review your grammar and spelling.

Microsoft Word would typically rely on it built-in Dictionary to confirm your use of words and their spellings. Therefore, if you use a word that isn’t in your Microsoft Word dictionary, you will get that red line. You can prevent this from occurring every time by creating your own custom Dictionary. Here’s how to do so.
How to Create a Custom Microsoft Word Dictionary
You may already be familiar with the custom Microsoft Word dictionary. Typically, when Word flags a word with a red line, you can right-click on it to get the ‘Add to Dictionary’ option. Therefore, when the same word is used in the future, you won’t see the red line under it. That’s how you can get rid of those red lines. Here’s how to do so:
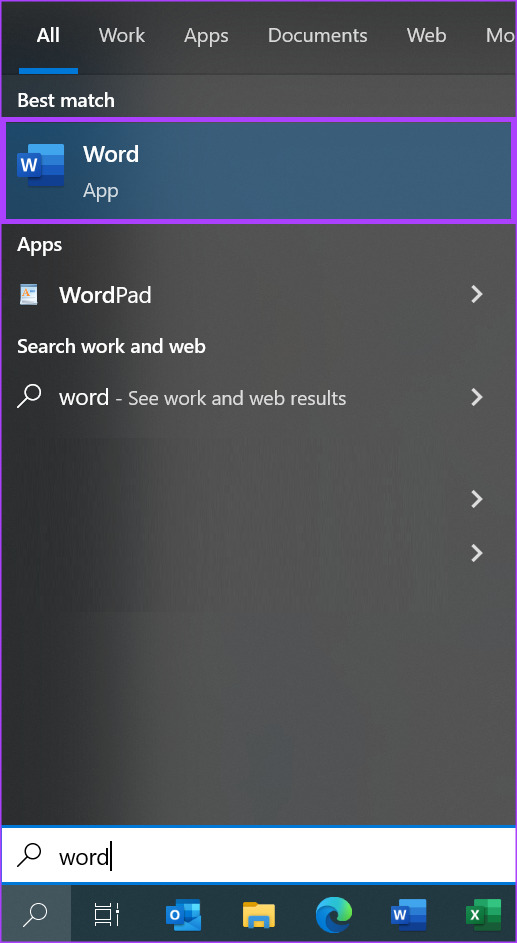
Step 1: Click the Start button and type word to search for the app.

Step 2: From the results, click on the Open option under the Microsoft Word app to open it.

Step 3: At the top-left corner of the Microsoft Office Ribbon, click on the File tab.

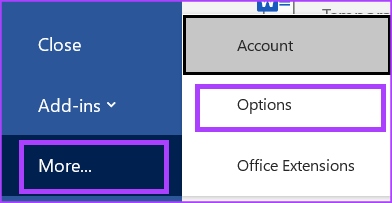
Step 4: Scroll to the bottom of the File menu and click on More Options to reveal a collapsed menu.

Step 5: Click Options from the menu.

Step 6: On the left of the Word Options pop-up, click the Proofing tab.

Step 7: Scroll down the proofing menu to ‘When correcting spelling in Microsoft Office programs.’

Step 8: Click on Custom Dictionaries to launch the Custom Dictionaries dialog box.

Step 9: Check that Word has automatically ticked the All Languages check box. If not, check those boxes.

Step 10: Click the New button to launch the Create Custom Dictionary File Explorer showing the location of your other Word dictionaries.

Step 11: Type a name for your new Word dictionary in the File name box.

Step 12: Click Save to close the File Explorer.

The newly created dictionary will appear under Custom Dictionaries.
Step 13: To apply your new dictionary to your Microsoft Word, tick the box beside the name.

Step 14: Click OK to close the Custom Dictionaries dialog box.

How to Add Words to Your Custom Microsoft Word Dictionary
After creating the file for your custom dictionary, the next step is to add words to it. Here’s how to do so.
Step 1: Click the Start button and type word to search for the app.

Step 2: From the results, click on the Open option under the Microsoft Word app to open it.

Step 3: At the top-left corner of the Microsoft Office Ribbon, click on the File tab.

Step 4: Scroll to the bottom of the File menu and click on More Options to reveal a collapsed menu.

Step 5: Click Options from the menu.

Step 6: On the left of the Word Options pop-up, click the Proofing tab.

Step 7: Scroll down the proofing menu to ‘When correcting spelling in Microsoft Office programs.’

Step 8: Click on Custom Dictionaries button to launch the Custom Dictionaries dialog box.

Step 9: Under the All Languages section, click on your custom dictionary name and click Edit Word list.

Step 10: Type a word you would like to add to the Dictionary.

Step 11: Click Add to view it under the Dictionary section.

Step 12: After adding all your words, click OK to close the box.

How to Delete a Custom Microsoft Word Dictionary
It’s natural that you wouldn’t want the custom dictionary to keep replacing words automatically. Luckily, you can delete it. Here’s how to do so:
Step 1: Click the Start button and type word to search for the app.

Step 2: From the results, click on the Open option under the Microsoft Word app to open it.

Step 3: At the top-left corner of the Microsoft Office Ribbon, click on the File tab.

Step 4: Scroll to the bottom of the File menu and click on More Options to reveal a collapsed menu.

Step 5: Click Options from the menu.

Step 6: On the left of the Word Options pop-up, click the Proofing tab.

Step 7: Scroll down the proofing menu to ‘When correcting spelling in Microsoft Office programs.’

Step 8: Click on Custom Dictionaries button to launch the Custom Dictionaries dialog box.

Step 9: Click on your custom dictionary name and click Remove.

Step 10: Click OK to close the Custom Dictionaries dialog box.

Enabling Auto-Capitalization in Word
With your custom dictionary, you no longer have to worry about having red lines all over your Word document. Another feature you can try out in Microsoft Word is the auto-capitalization feature. With auto-capitalization, you don’t have to worry about having the right capitalization for your words.
No comments:
Post a Comment